Multi-region deployment using AWS CodePipeline
The implementation process is one of the key stages of the software cycle and is associated with its installation and adaptation to the needs of the user. In order to improve the entire process, AWS has prepared services related to the DevOps culture. These include AWS CodeDeploy, AWS CloudFormation, Amazon S3 or AWS CodePipeline, which is the main character of this entry.
 AWS CodeDeploy – is a service that automates the implementation of software for various computing services, such as Amazon EC2, AWS Lambda and on-premise servers.
 AWS CloudFormation – provides a common language to describe and provide all infrastructure resources in a cloud environment.
 Amazon S3 – is a simple web service interface that can be used to store and retrieve any amount of data, at any time and from anywhere on the network.
 AWS CodePipeline – is a fully managed service that allows automation of pipelines for fast and reliable updates of applications and infrastructure. Thanks to the ability to support actions between AWS regions, it enables the application to be implemented with a single pipeline in many regions. This affects not only the availability of the application but also the delays associated with it.
How AWS CodePipeline works?
The service divides the entire workflow into individual stages. An example would be the building phase, during which the written code is run and tested. Another example is the deployment stage, where updates are implemented in a production environment. Each element of the process can be marked for better tracking, control and reporting of its progress.
Each pipeline contains at least one action (action performed on the artifact). Pipeline activities are performed in a specific order; sequentially or in parallel – according to the configuration at a given stage. A detailed description of how AWS CodePipeline works can be found in the runbook.
In this post we will show:
- How to create a software delivery continuity pipeline with the help of AWS CodePipeline, provided by AWS CloudFormation.
- How to configure the action pipeline and run it in a different region than it was configured.
- How to implement an example application in many regions with the help of AWS CodeDeploy.
High-level deployment architecture
 The diagram illustrates (in general terms) the process of implementing an architecture for the needs of the deployment process. The first phase is loading the latest version of the application code into the Amazon S3 service. Each new update loaded into the bucket starts the AWS CodePipeline service.
For each CodePipeline Action in AWS CodeDeploy, the application code from Amazon S3 is replicated to the artifact store in the region for the given action. Each action implements the latest version of the application to the Amazon EC2 instance in the region.
To create a pipeline in many regions, follow these steps:
- Configure the resources that will be needed for implementation with the help of AWS CodeDeploy.
- Configure “artifact stores” (S3 buckets) for AWS CodePipeline in each region.
- Create an AWS CloudFormation for AWS CodePipeline.
- Check deployments carried out by pipeline in the AWS Management Console.
- Check the correctness of implemented deployments.
What’s next?
The first step is to install the AWS CodeDeploy agent on the instances. The agent is a software package enabling deployments. At this stage you need to do 2 things:
- create Amazon EC2 instances and install the AWS CodeDeploy agent,
- create AWS CodeDeploy applications.
To improve this performance, you can use the AWS CloudFormation template.
ATTENTION! Before you get started, it’s a good idea to make sure your keys are properly configured to allow SSH access to Amazon EC2 instances in your region. Detailed instructions on how to do this can be found here.
Phase 1
To run Amazon EC2 and AWS CodeDeploy instances, you can use AWS CloudFormation templates prepared by AWS (available in the links below):
In the AWS console, on the Specify Details page, do the following:
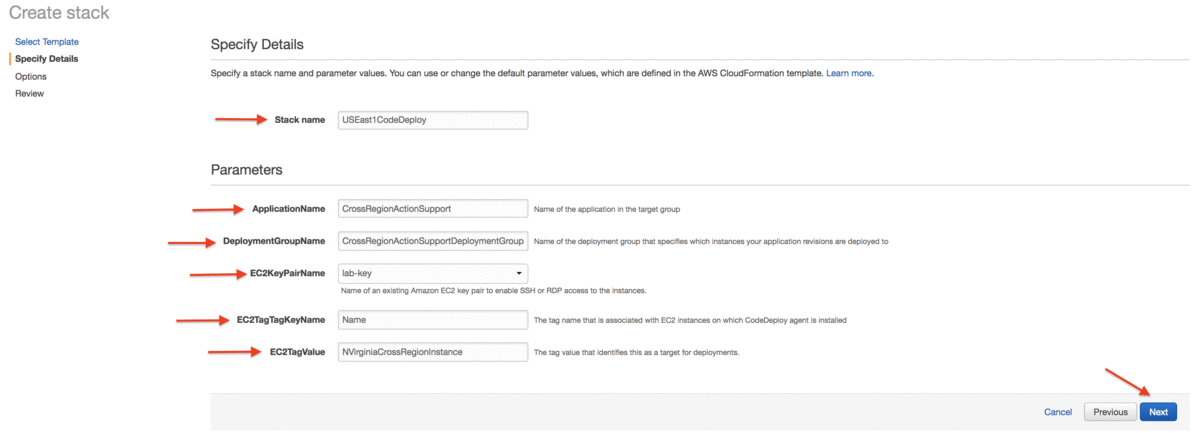
- In Stack name, enter a name for the stack (for example, USEast1CodeDeploy).
- In ApplicationName, enter a name for the application (for example, CrossRegionActionSupport).
- In DeploymentGroupName, enter a name for the deployment group (for example, CrossRegionActionSupportDeploymentGroup).
- In EC2KeyPairName, if you already have a key pair to use with Amazon EC2 instances in that region, choose an existing key pair, and then select your key pair. For more information, see Amazon EC2 Key Pairs.
- In EC2TagKeyName, enter Name.
- In EC2TagValue, enter NVirginiaCrossRegionInstance.
- Choose Next.
Creating resources can take several minutes. Progress can be observed in the console in the Events tab. When the stack is created, the “CREATE_COMPLETE” message will appear in the Status column.
Newly created instances should be visible in each of the regions in which deployment was carried out.

Phase 2
Configure artifact stores for AWS CodePipeline. Amazon S3 uses buckets as storage for artifacts. Buckets are regional and versioned. All artifacts are copied to the region where the pipeline action is to be performed.
To create such storage using AWS CloudFormation, you must download a template for each region.
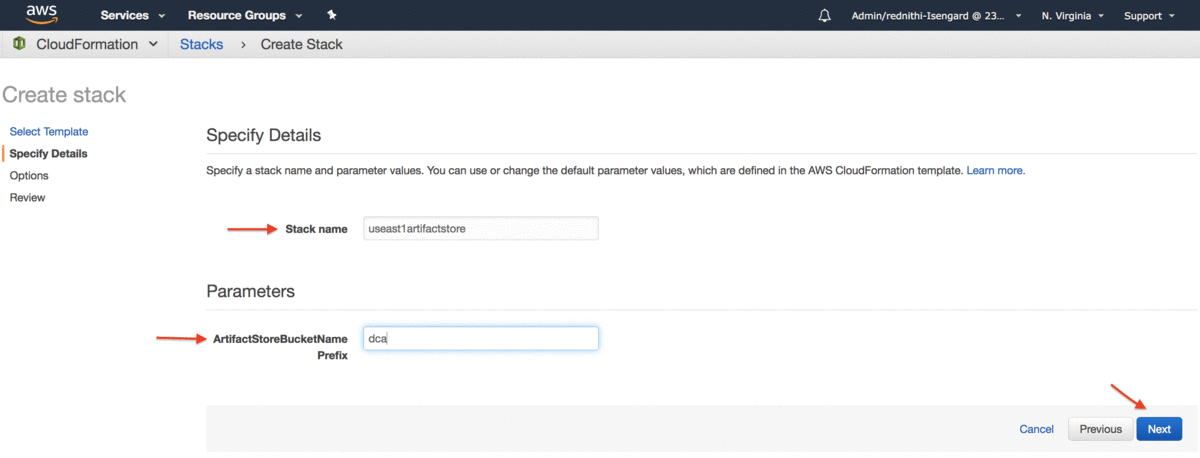
On the Specify Details page, do the following:
- In Stack name, enter a name for the stack (for example, artifactstore).
- In ArtifactStoreBucketNamePrefix, enter a prefix string of up to 30 characters. Use only lowercase letters, numbers, periods, and hyphens (for example, useast1).
- Choose Next.
As before, the creation of resources may take several minutes, and the progress of the operation is visible in the Events tab in the AWS console.
Remember to copy Amazon S3 bucket names from all regions. They will be needed in the next steps.
IMPORTANT! All buckets, including the bucket for Source action in pipelines, must be able to track versions uploaded and processed by AWS CodePipeline.
Phase 3
Use the AWS CloudFormation template to define resources:
- Amazon S3 Bucket (source bucket for application source code),
- AWS CodePipeline for which you must define the appropriate actions within the pipeline phases: Source action (S3) and the appropriate number of Deploy action (CodeDeploy type) for each region.
To create a new bucket S3, you must start the console, and then select the AWS CloudFormation service, download the template and run it in the main region.
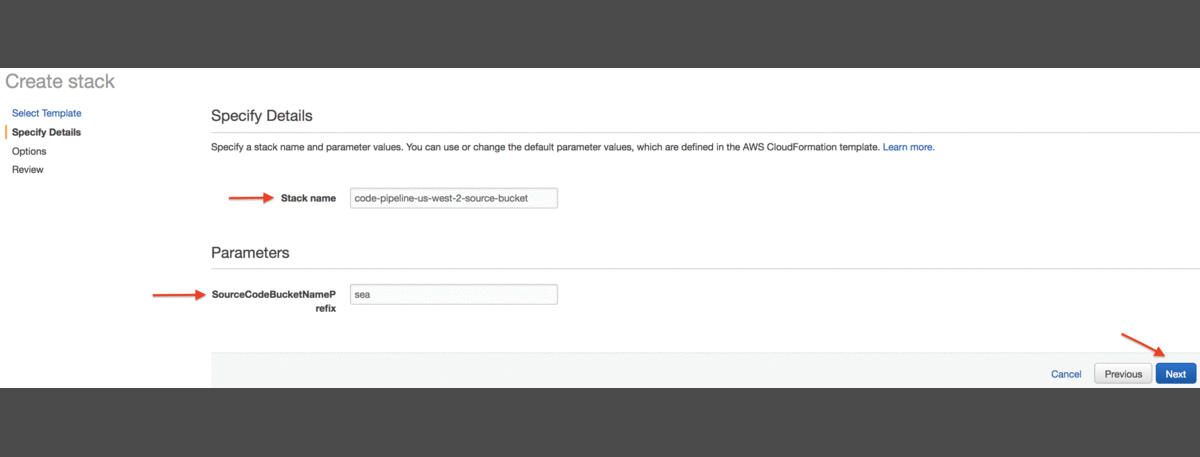
On the Specify Details page, do the following:
- In Stack name, enter a name for the stack (for example, code-pipeline-us-west2-source-bucket).
- In SourceCodeBucketNamePrefix, enter a prefix string of up to 30 characters. Use only lowercase letters, numbers, periods, and hyphens (for example, uswest2).
- Choose Next.
Creating resources can take several minutes, and progress is visible in the Events tab of the AWS console.
When the creation process is completed, download the sample application from s3-app-linux.zip and load it into the source code bucket.
To create a new pipeline in AWS CodePipeline:
In the console, run the downloaded AWS CloudFormation template in the main region, us-west-2.
On the Specify Details page, do the following:
- In Stack name, enter a name for the stack (for example, CrossRegionCodePipeline).
- In ApplicationName, enter a name for the application (for example, CrossRegionActionSupport).
- In APSouthEast2ArtifactStoreBucket, enter cross-region-artifact-store-bucket-ap-southeast-2 or enter the name you provided in step 2 for the S3 bucket created in ap-southeast-2.
- In DeploymentGroupName, enter a name for the deployment group (for example, CrossRegionActionSupportDeploymentGroup).
- In S3SourceBucketName, enter code-pipeline-us-west-2-source-bucket or enter the name you provided in step 3.
- In USEast1ArtifactStoreBucket, enter cross-region-artifact-store-bucket-us-east-1 or enter the name you provided in step 2 for the S3 bucket created in us-east-1.
- In USWest2ArtifactStoreBucket, enter cross-region-artifact-store-bucket-us-west-2 or enter the name you provided in step 2 for the S3 bucket created in us-west-2.
- In S3SourceBucketKey, enter s3-app-linux.zip.
- Choose Next.

Phase 4
We can now check the deployments carried out by the prepared pipeline in the AWS console. In the S3 console, go to the source bucket and copy the version ID.
Then go to AWS CodePipeline and go to the pipeline that has just been created. Note that the version ID is the same in all regions, both in source action and all deploy actions. Deployment has been successfully completed.

To make sure that the action is successful, enter the public IP address of the Amazon EC2 instance in the browser, which was provided by AWS CodeDeploy in stage 1. The following message should appear in the browser.

To sum up – we’ve just done a multi-regional deployment, without having to worry about the process of copying code between regions. To make further changes, simply apply the changes to the source code in the main region, and they will be implemented automatically using AWS CodeDeploy. Code changes can also be used to build and test between regions. Once we know the deployment options, the next step is to remove the buckets and stack. Although the buckets were created using AWS CloudFormation, there is no way to remove them along with the stack. To do this, enter the Amazon S3 console and follow the steps in the instructions for removing / emptying buckets. To remove the AWS CloudFormation stack, follow the steps in the instructions.
If you have additional questions, it’s always a good idea to use the AWS CodePipeline forum or AWS Support.
The practical use of AWS services can also be found on our YouTube channel, where Wojtek Orzechowski talks about the project we implemented for Goop.com.